Simple Rafiki Integration Guide
Written by Max Kurapov, Timea Nagy, Dragos Palade, Tadej GolobicIn this guide, we provide you, a developer who’s starting to integrate Rafiki into your ASE (Account Servicing Entity), a simple walkthrough for how to make your first payment using Rafiki. Here, we will introduce simple concepts, and the necessary APIs & webhook events to complete a payment between a sender and receiver in your ASE.
While we have detailed documentation, we understand that this may be overwhelming for someone new in the ecosystem, so this guide will be a good starting point in the journey of adapting Interledger technologies.
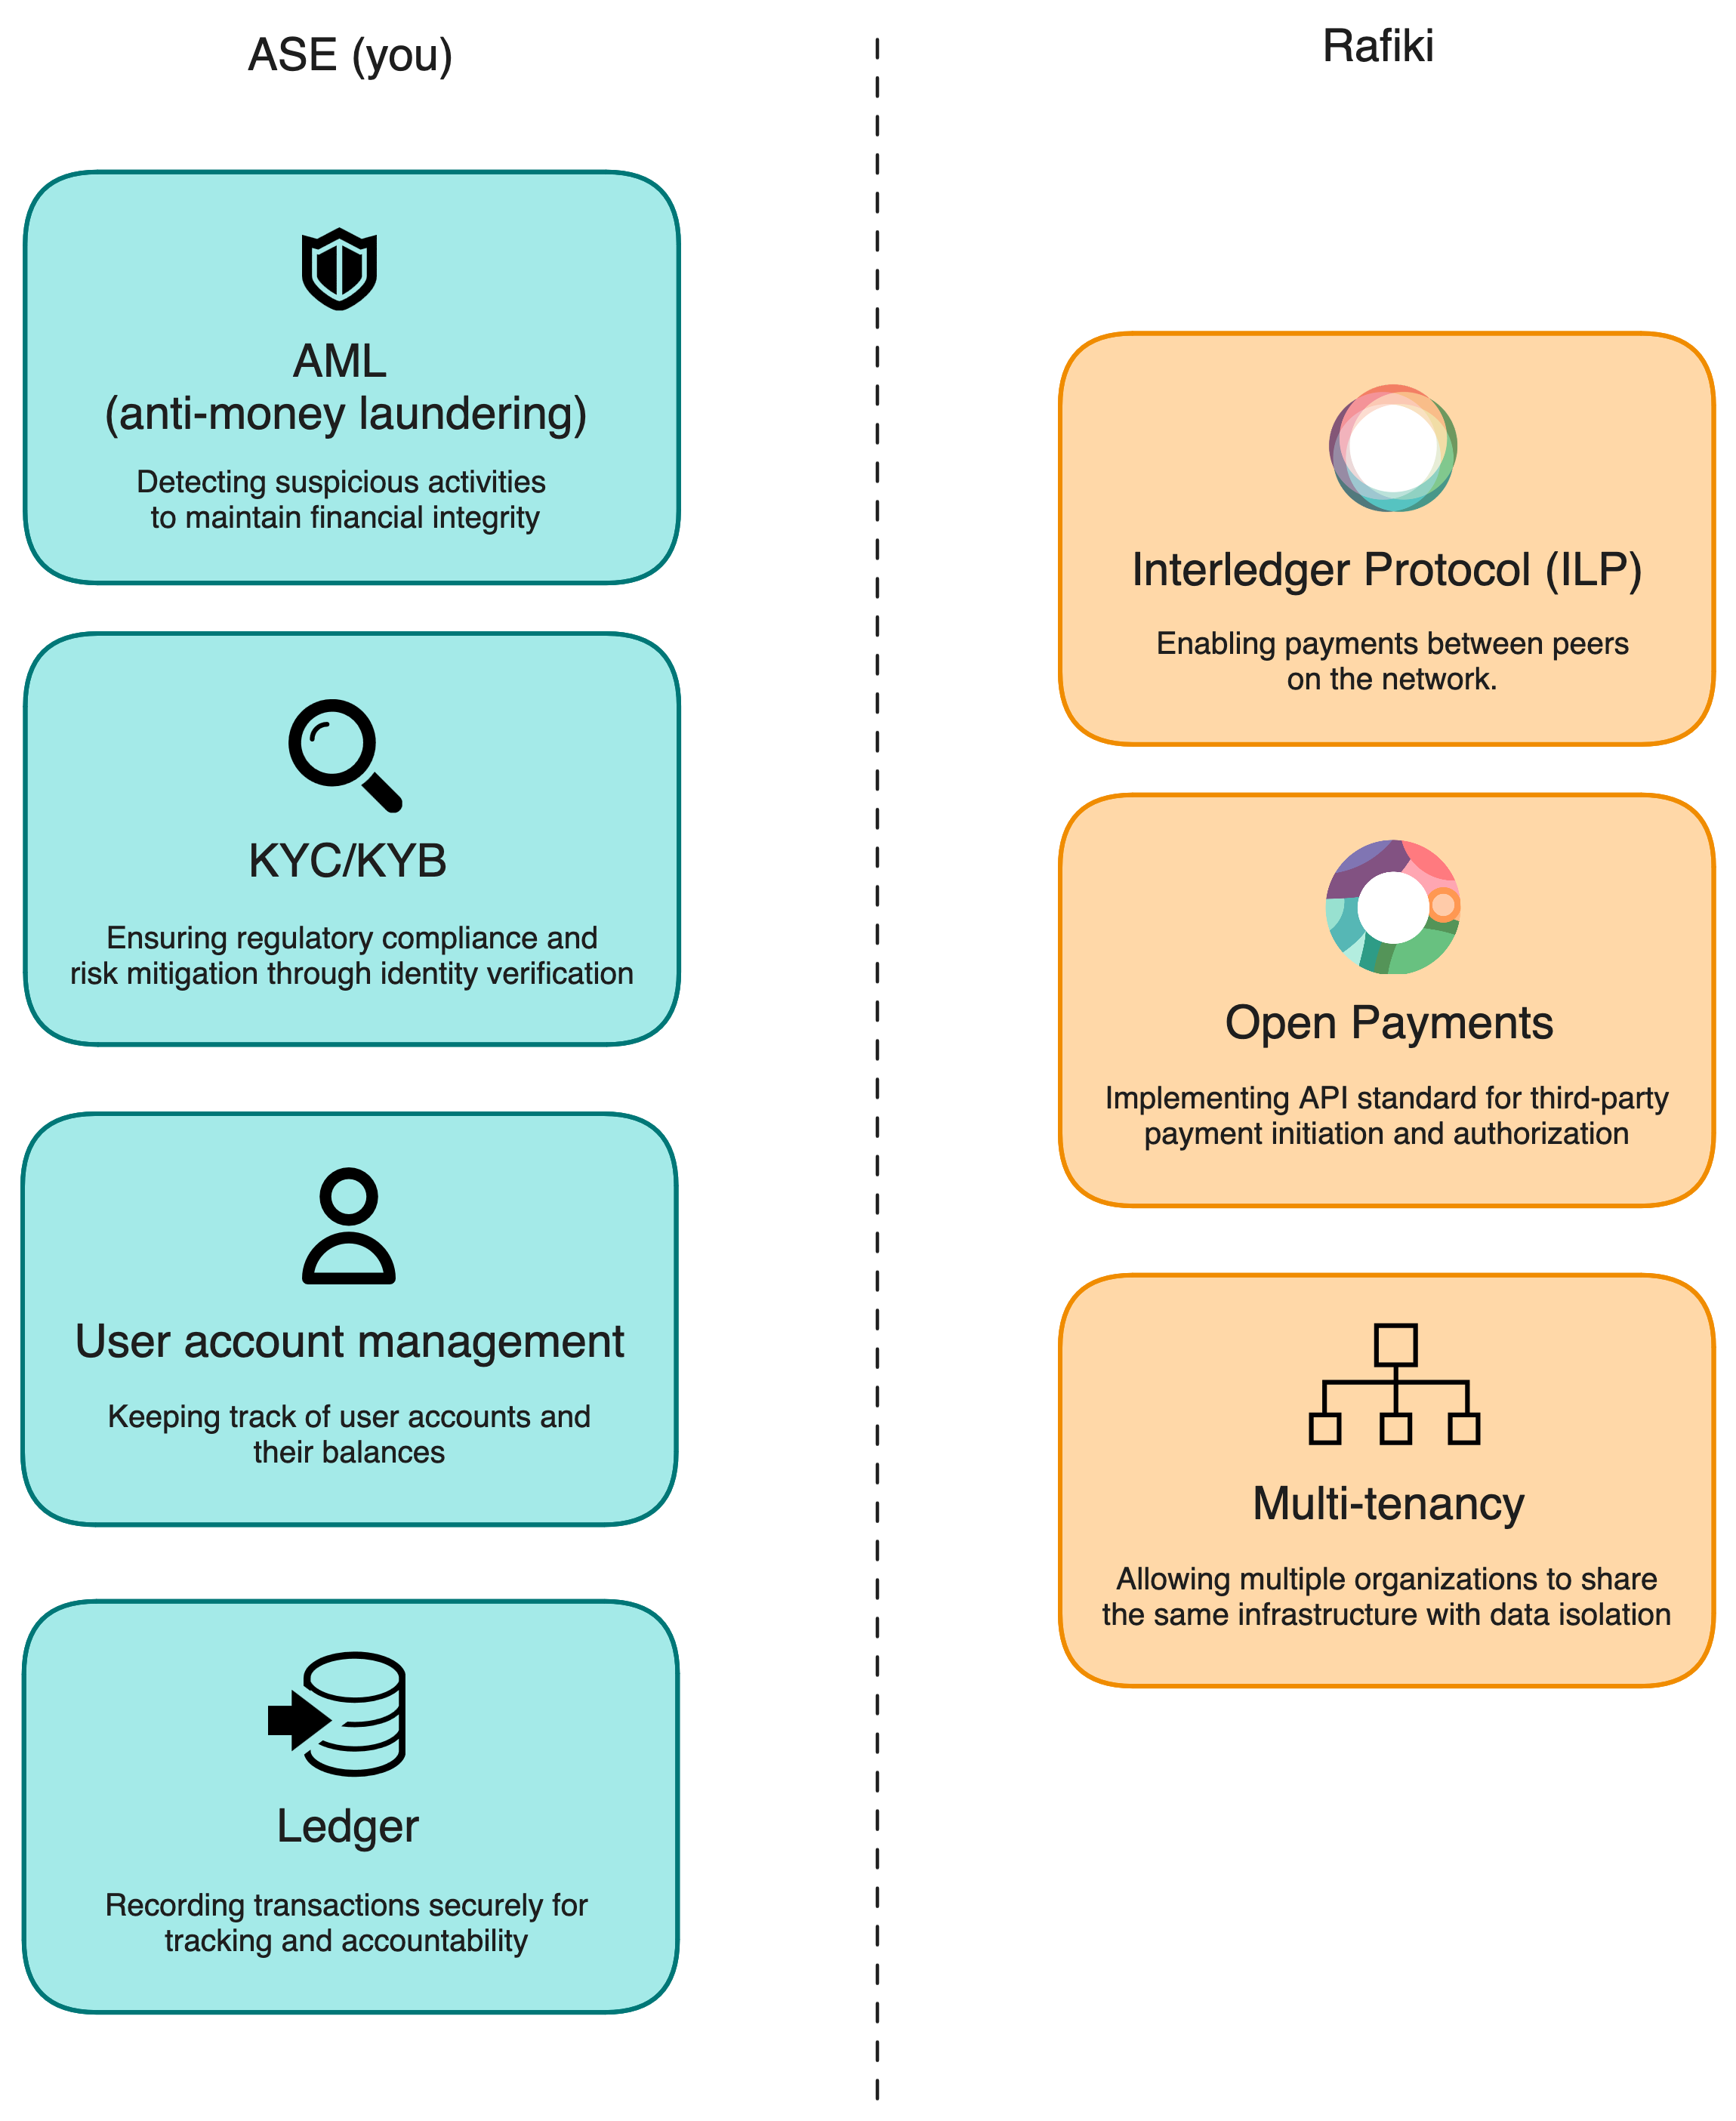
First of all, let’s see what an ASE is responsible for, in comparison to what Rafiki takes care of.
ASE and Rafiki responsibilities
Open Payments and ILP
Open Payments API
Open Payments is an API standard for allowing third-party clients to initiate payments between wallet addresses.
Use cases
- eCommerce payments
- Peer to peer payments (e.g. remittances)
- Recurring payments (e.g. subscriptions)
ILP (Interledger Protocol)
A protocol for transferring payments (through packets). If the Open Payments API is responsible for payment authorization, then ILP is how the payments actually happen.
Basic concepts
Wallet addresses
A wallet address is a sharable identifier (URL) linked to an underlying user account at an ASE, and accessible via the Open Payments API standard.
Assets
Assets represent monetary values, for example, country currencies. Each asset is made up of a code, and a scale to represent the decimal units. For example, US dollars can be delineated as code: USD, with scale 2, where value 1000 represents $10.00.
Integrating Rafiki with your system
Components
Currently, Rafiki is made up of three software components:
backend: hosts the Open Payments resource server, ILP connector, and the Admin APIauth: hosts the Open Payments auth serverfrontend: UI to manage the Rafiki resources (wallet addresses, payments, assets, e.t.c.) through the Admin API.
Admin API
As an ASE, the main entrypoint into the Rafiki system will be through the Admin API. This is a GraphQL API.
Integration steps
Creating assets
In order to begin your Rafiki integration, you need to load the assets you will support for your users. For example, if you will be supporting US dollars, you must create an USD asset in Rafiki through the Admin UI or Admin API.
Creating wallet addresses
After creating at least one asset, you can start creating wallet addresses under that asset. This wallet address must be linked to a user account in your sytem, and will be publicly accessible through the Open Payments API.
Making payments
Making payments consists of three parts:
1. Creating an incoming payment
First, you will need to create an incoming payment for a recipient’s wallet address using the Admin API’s createIncomingPayment. This will set up a resource to pay into.
2. Creating a quote
Second, you will need to create a quote for a sender’s wallet address using the Admin API’s createQuote. This will show how much it will cost the sender to deliver an amount to the receiver.
3. Creating an outgoing payment
Third, you will create an outgoing payment for the sender’s wallet address using the Admin API’s createOutgoingPayment. This will be the operation to actually start the payment. At this point, you as the ASE will need to fund/approve the outgoing payment before it gets sent.
Webhook request handling
When operating Rafiki, you as the ASE will be notified about events that happen in the system, e.g. an incoming payment was created or expired. Some of these events are actionable, for example, the outgoing payment created event. When an outgoing payment is created, you as the ASE will need to:
- Check that the user account (for the linked wallet address) is active
- Check that the user account has enough balance to make the payment
- Reserve funds on the user account
- Notify Rafiki to approve the outgoing payment by calling the
depositOutgoingPaymentLiquidityAPI.
Once the outgoing payment has been approved/funded, Rafiki will make the payment between the sender and receiver.
- If the payment in Rafiki is successful, you will receive an outgoing payment completed webhook. When this is received, you should finalize the debit of the sending user’s account.
- You will also receive an incoming payment completed (or incoming payment expired) webhook. For these webhooks, you should credit the recipient’s user account.
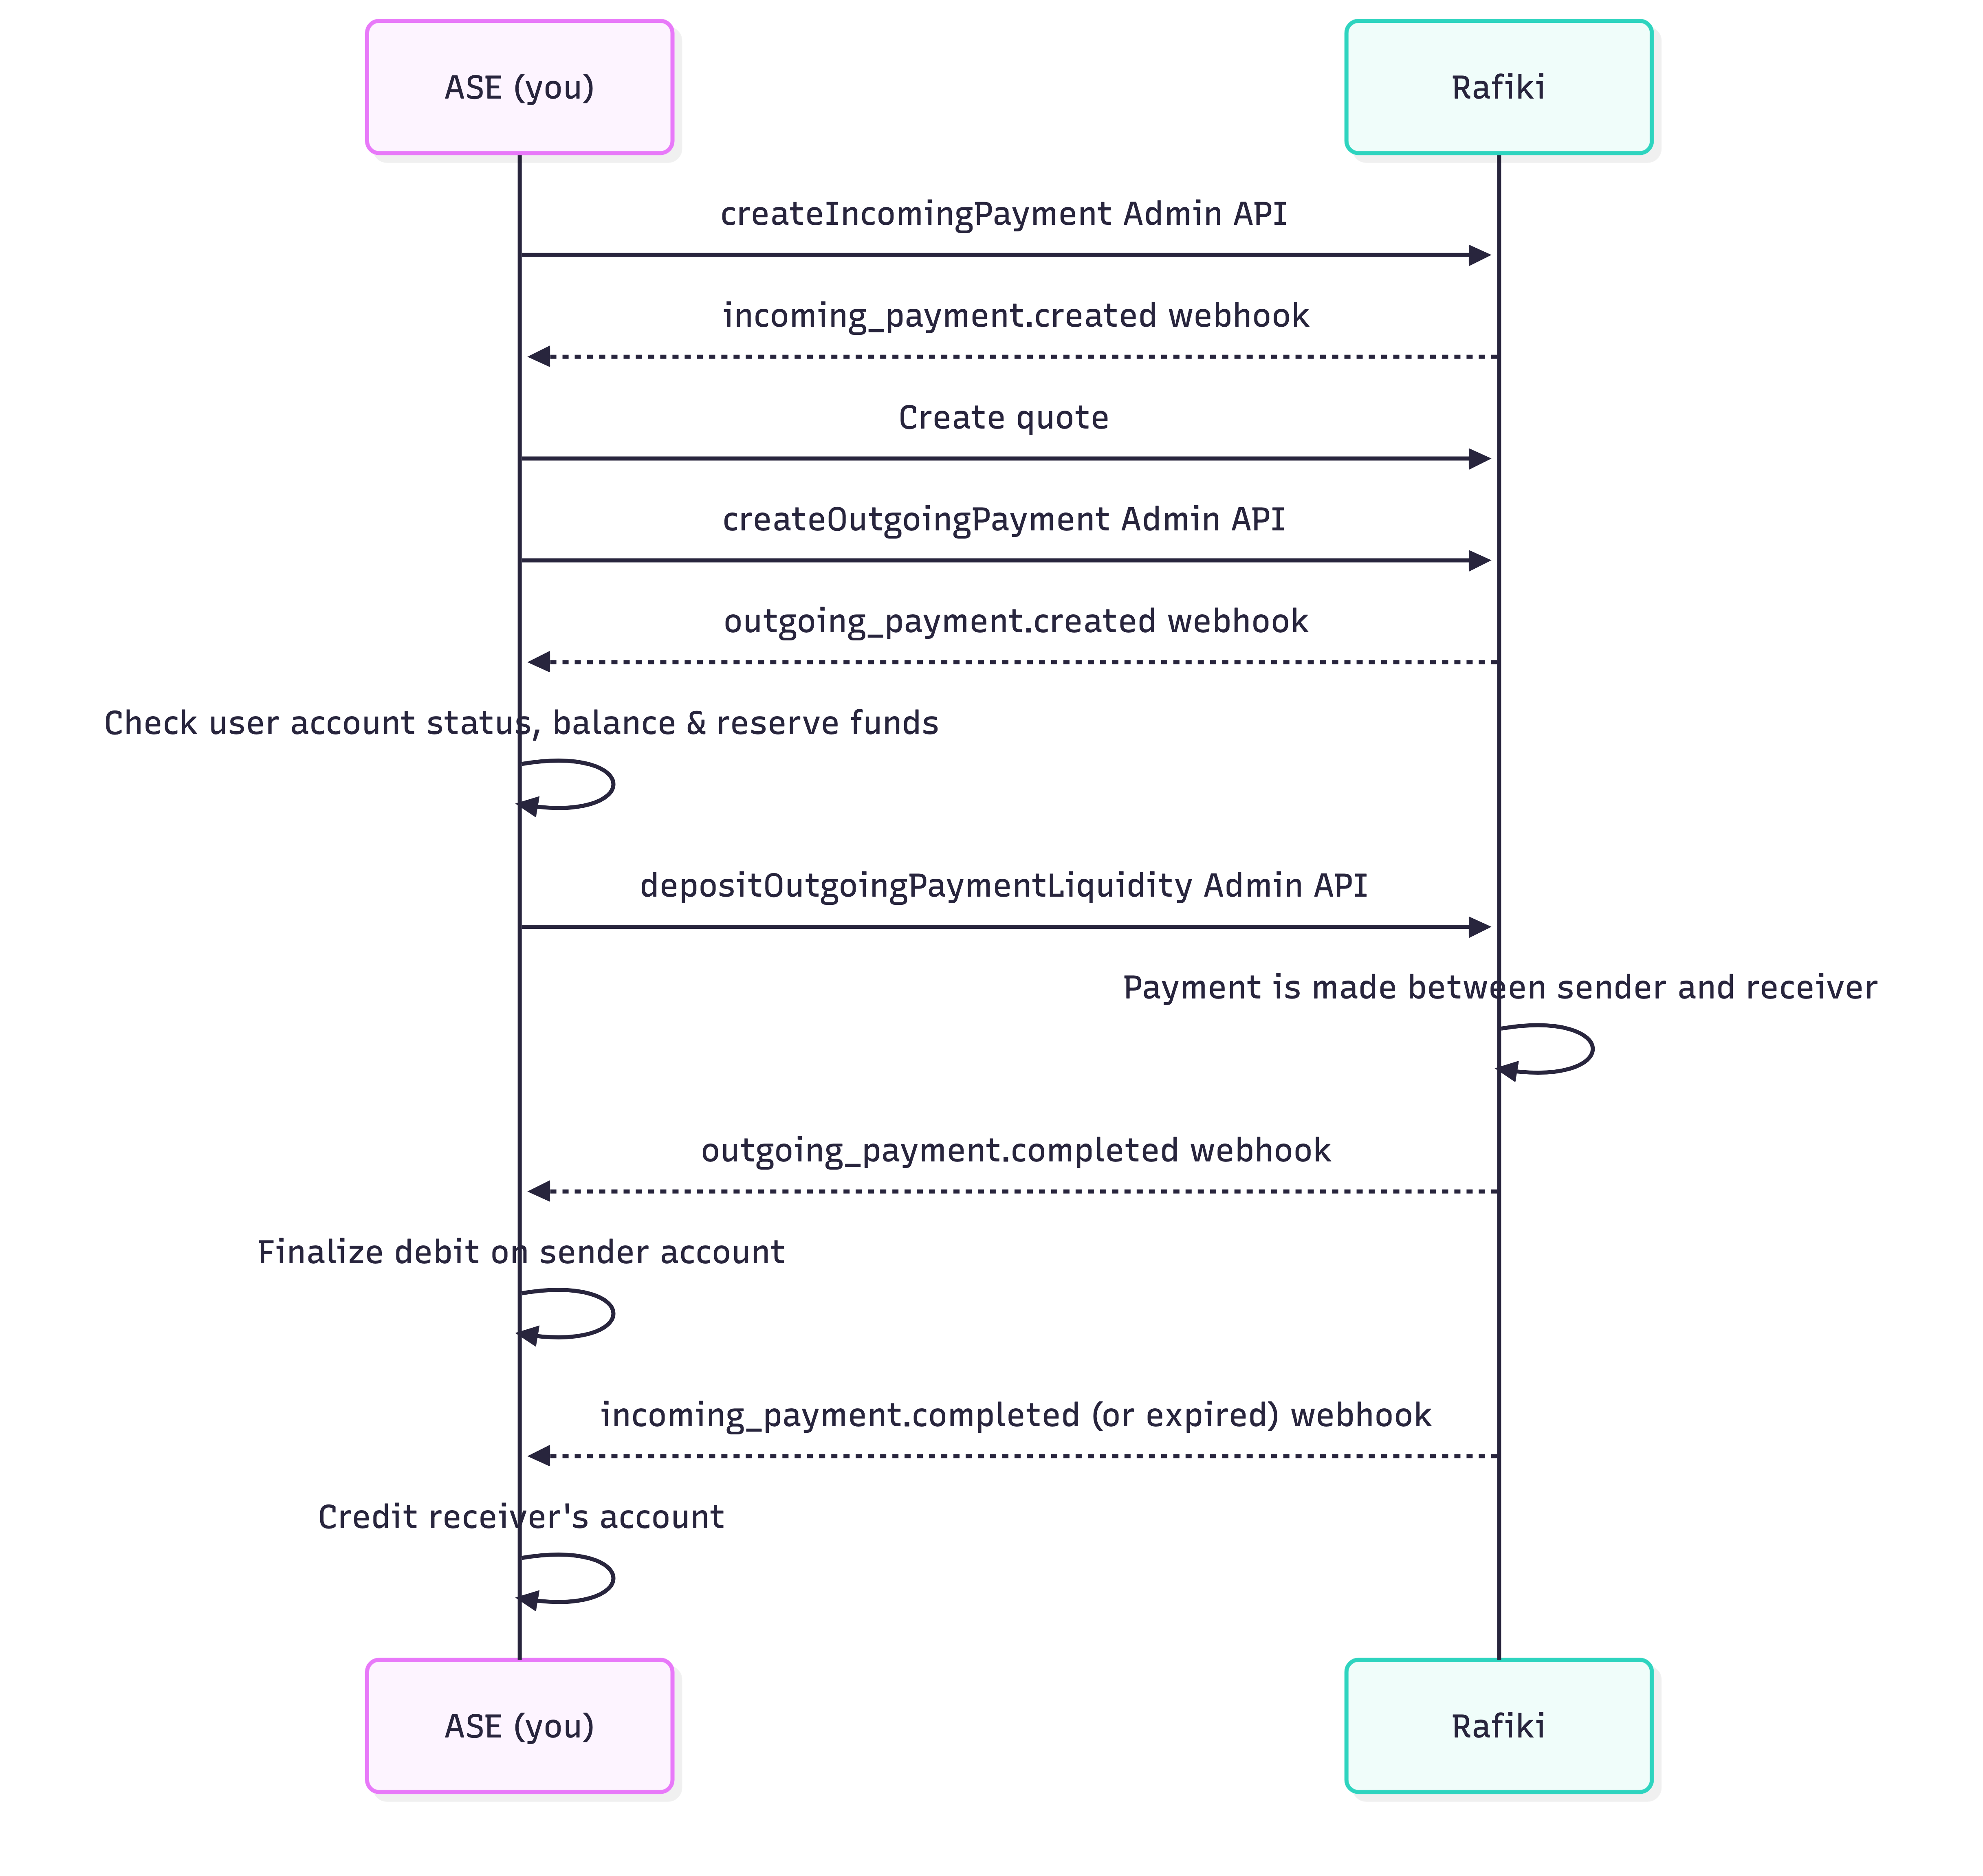
The Rafiki documentation describes all of the webhook events and how they should be handled.
Note
When Rafiki sends a webhook to the ASE, it expects a 200 response. Otherwise, it will keep retrying.
Hopefully, this provided you a good starting point to complete your first payment!
If you have other questions, we invite you to join our community Slack channel, and attend our Rafiki community calls every third Tuesday of the month at 14:30 UTC. The FAQ section below is a living one, and any new questions you may have will be added below.
FAQ
What APIs are exposed publicly?
Open Payments endpoints + ILP connector. The Admin API must not be exposed externally.
Can you make cross-currency payments?
In order to make cross-currency payments, you will need to create the corresponding assets, and provide a way for Rafiki to fetch rates.
As we are open source, you can easily check our work on GitHub. If the work mentioned here inspired you, we welcome your contributions. You can join our community slack or participate in the next community call, which takes place each second Wednesday of the month.
If you want to stay updated with all open opportunities and news from the Interledger Foundation, you can subscribe to our newsletter.